

Business Card Demystified / Create Business Card in Adobe Illustrator
There are a bunch of posts explaining how to create business cards, but you will rarely find detailed explanations about preparing print ready files and what is it exactly what you need to do in order to make sure your files are ready for printing.
To create business card you can use Photoshop, Illustrator, Corel Draw or any other graphic software. I personally prefer Adobe Illustrator. Using Illustrator I can create graphics in vector format which means my files will be print ready, when scaled resolution will not change and output files will be small sized. When you create print ready graphics in Photoshop you need to use 300 dpi resolution and output files will be huge, from a couple of dozens MB to a couple of hundreds of MB. Illustrator output can be 10-20 times smaller than that, if you are not using raster graphics (any image that is not a vector graphic is raster graphic). Vector formats are SVG, EPS, AI and Using Illustrator you can save it even in PDF, so anyone can open it just like any other file / document using Adobe Reader. Isn’t that neat?
BUSINESS CARD DIMENSION
Here is a table with some aspect ratios.
| Country/Standard | Dimensions (mm) | Dimensions (in) | Aspect ratio |
|---|---|---|---|
| ISO 216, A8 sized | 74 × 52 | 2.913 × 2.047 | 1.423 |
| Ireland, Italy, United Kingdom, France, Germany, Austria, Netherlands, Spain, Switzerland, Belgium, Slovenia, Portugal | 85 × 55 | 3.346 × 2.165 | 1.545 |
| ISO/IEC 7810 ID-1, credit card sized | 85.60 × 53.98 | 3.370 × 2.125 | 1.586 |
| Australia, Denmark, New Zealand, Norway, Taiwan, Sweden, Vietnam, India, Colombia, South Korea | 90 × 55 | 3.54 × 2.165 | 1.636 |
| Japan | 91 × 55 | 3.582 × 2.165 | 1.655 |
| Hong Kong, China, Singapore | 90 × 54 | 3.543 × 2.125 | 1.667 |
| Canada, United States | 88.9 × 50.8 | 3.5 × 2 | 1.75 |
| Iran | 85 × 48 | 3.346 × 1.889 | 1.771 |
| Sri Lanka, Argentina, Brazil, Costa Rica, Czech Republic, Croatia, Estonia, Finland, Hungary, Israel, Kazakhstan, Lithuania, Poland, Romania, Russia, Serbia, Montenegro, Slovakia, Ukraine, Uzbekistan, Bulgaria, Latvia, Mexico and South Africa | 90 × 50 | 3.543 × 1.968 | 1.8 |
Why we use standards? Simple, depending on your region your print house will use specific paper format. When you pay for printing you graphics you pay for paper, color and service. If your graphics are custom formatted they will require more paper, so you pay more.
LET’S START!
Open Illustrator and set your new document to be 90x50mm, choose CMYK color profile which is used in printing, make desired number of art-boards (can be done later also) and set BLEEDS to at least 3mm.
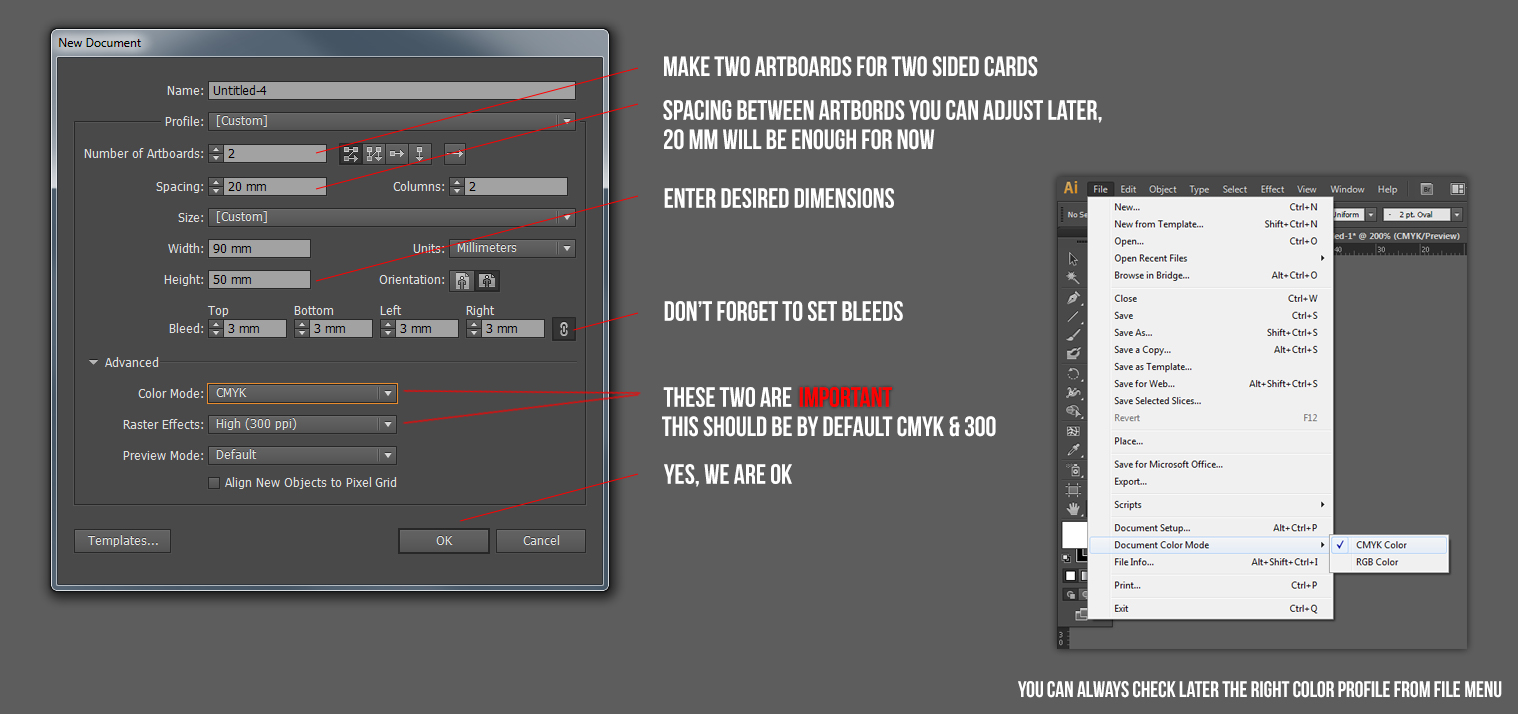
Bleed is area around your graphics that will be trimmed off after printing. Also bleed is very important since while trimming the trimming knife can move a bit and if bleed has no background color or graphics there will be visible a line of paper color on trimmed edge, and you don’t want that. Beside bleed, there is also (invisible) safe zone that you should have in mind. Safe zone should contain only your background graphic that extends to bleed area and you shouldn’t put any text there since it won’t look too good if it is too close to the edge (unless your design requires that, it depends).

After you create your graphics and text and all information that you need it is good thing to create outlines from your text (right click on text and select create outlines), that way text will be converted into shapes and no one can change it or mess with it.
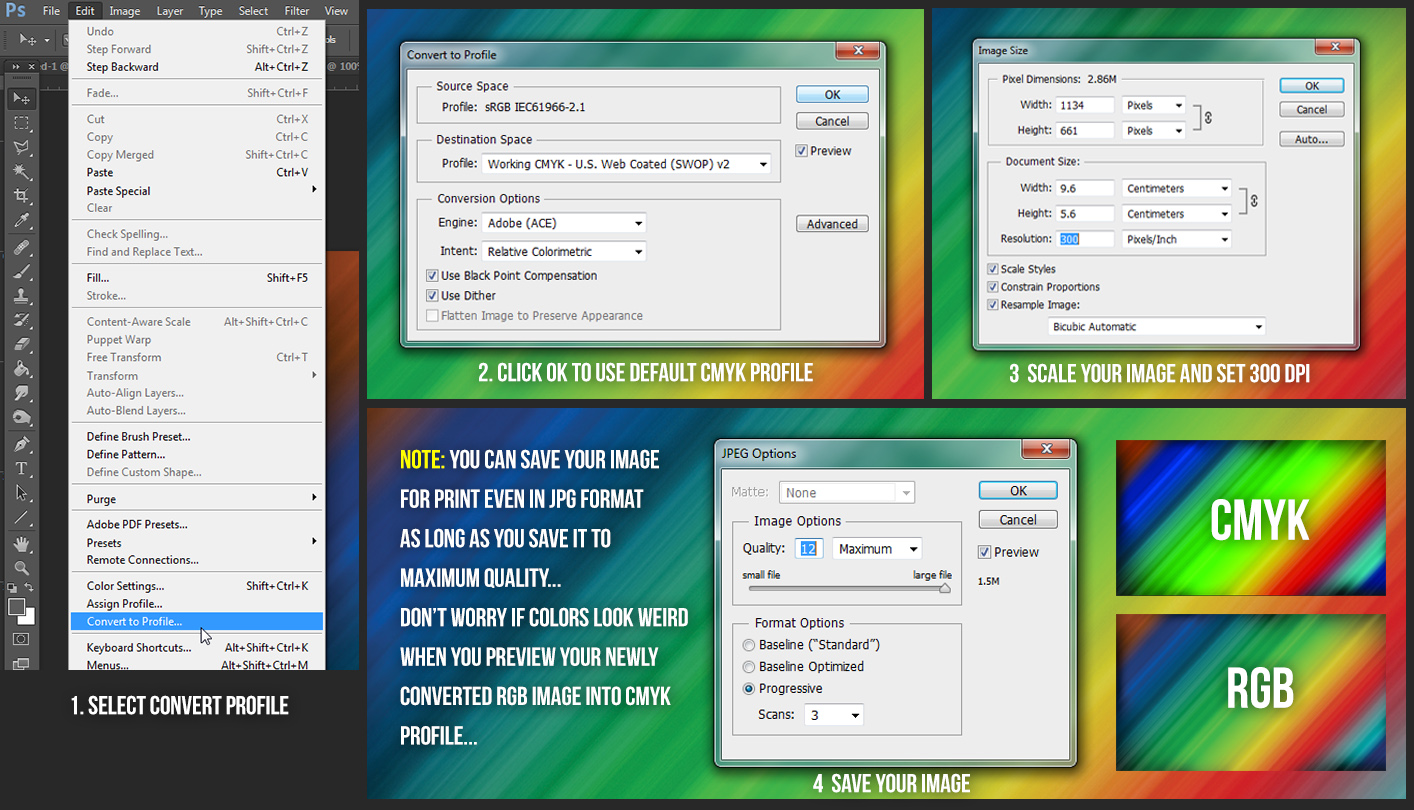
IMPORTANT: If you insert some images from computer or directly from browser into Illustrator art-board they will probably be in RGB profile and 72 DPI (DPI: Dots Per Inch) resolution. For print purposes you NEED CMYK color profile and 300 DPI images. To accomplish that, open desired image in Photoshop, scale it to right size, convert it to CMYK profile and save it in maximum quality. Drag prepared image in Illustrator and click embed image button.
SAVE YOUR PRINT READY FILE
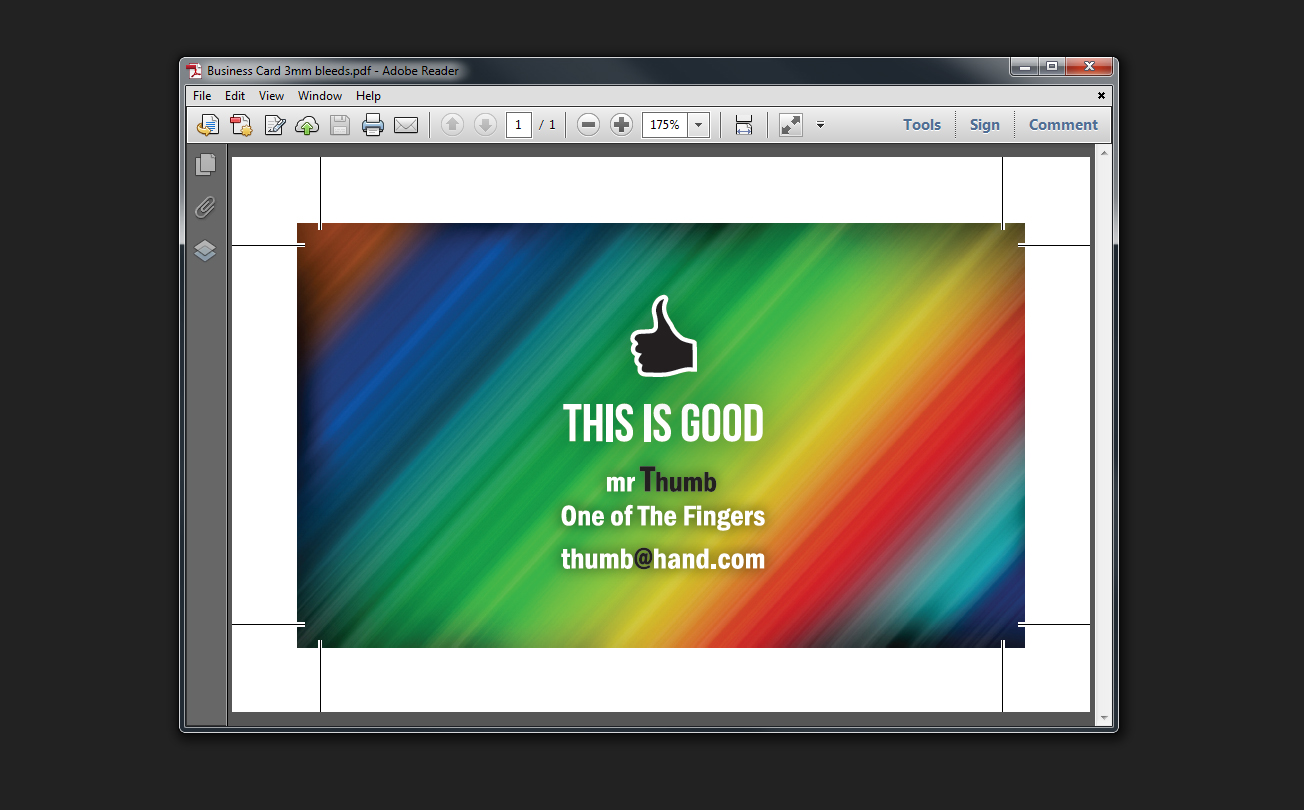
Save your document from file menu File/Save as/PDF and set PDF options so it will keep editing options and include trim marks. Also, most important is that you do not down-sample your document. See image below for more detailed information.

At the end your final output file can be previewed in Adobe Reader, it is print ready and you can edit it later if you want, even if it is in PDF format. Just open it with Illustrator and since you have selected “Preserve Illustrator Editing Capabilities” this PDF file is the same as Illustrator native format AI. Keep your original AI file without text conversion to outlines as a backup, remember that I said it is a good thing to create outlines from text when you save your print ready document.
YOUR FINAL PRINT READY FILE
Cheers!


Thank you for tutorial.